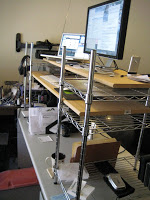
Standing Desk
I decided to try working standing up. I wasn’t ready to invest in something like a geekdesk, and I wanted something that would be easily reversible if I ended up hating it.
So I wanted something that would build on top of my existing regular desk.
| I found 3-tier wire [shelving units](http://www.lowes.com/pd_328958-80752-LO-RM-R-0034294857717_4294937087?productId=3192557&Ns=p_product_price | 0&pl=1¤tURL=%2Fpl_Free%2BStanding%2BShelving_42948577174294937087%3FNs%3Dp_product_price | 0) at Lowes for $19.99 each. They are 30” high, 24” wide and 14” deep and each shelf is adjustable in about 1” increments. I bought two of these, and two 4’ long 16” deep MDF bullnose [shelving boards](http://www.lowes.com/pd_249499-99999-17012644294815774_4294937087?productId=3195379&Ns=p_product_prd_lis_ord_nbr | 0 | p_product_quantity_sold | 1&pl=1¤tURL=%2Fpl_Shelving_42948157744294937087%3FNs%3Dp_product_prd_lis_ord_nbr | 0 | p_product_quantity_sold | 1) for $6 each. I adjusted the middle shelf of the shelving units at the height I want the keyboard/mouse at, and the top shelf about 6” above that to hold the monitor and laptop display. Then just laid the two shelving boards across - the keyboard shelf towards the front and the monitor shelf towards the back (the wire units are 24” wide and the MDF board is 16” so there is room to move the top board back and the bottom board forward - so my view of the keyboard isn’t blocked by the top shelving board). |
I put some foam rubber scraps beneath each board so it doesn’t slide around on the slick wire.
Written on March 26, 2011
